Introduction
Last updated: September 2024
This module handles the essential preprocessing steps for multiplex imaging data (PhenoCycler/CODEX) before downstream analysis.
It can be executed by modifying and running the main shell script:
run_preprocess_ft.sh
Processing Pipeline Architecture
Main Entry Script
The preprocessing workflow is orchestrated by the main entry script:
run_preprocess_ft.sh [MAX_CONCURRENT]
Key Features
- Batch Processing: Processes multiple experiments defined in the
EXPERIMENTSarray - Parallel Execution: Supports concurrent processing with configurable limits (default: 2 concurrent experiments)
- Automated Workflow: Sequentially executes tissue extraction followed by antibody extraction for each experiment
- Comprehensive Logging: All output and errors are logged to individual files per experiment
- Process Management: Monitors and controls background processes with PID tracking
Script Configuration
The script requires configuration of several key variables:
- Experiment Set: Defined by
EXP_SET_NAME(e.g., "preprocess/preprocess_ft") - Experiment IDs: Listed in the
EXPERIMENTSarray (e.g., "D10", "D11", "D13", etc.) - Directory Structure:
- Configuration files:
exps/configs/{EXP_SET_NAME}/{EXP_ID}/config.yaml - Log files:
logs/{EXP_SET_NAME}/{EXP_ID}.log - Output directory: Uses the same data directory as input
- Configuration files:
Execution Flow
For each experiment ID, the script:
- Tissue Extraction: Calls
scripts/run_extract_tissue.shto identify and extract tissue regions - Antibody Extraction: Calls
scripts/run_extract_antibody.shto extract antibody marker information - Logging: Captures all output with timestamps for debugging and monitoring
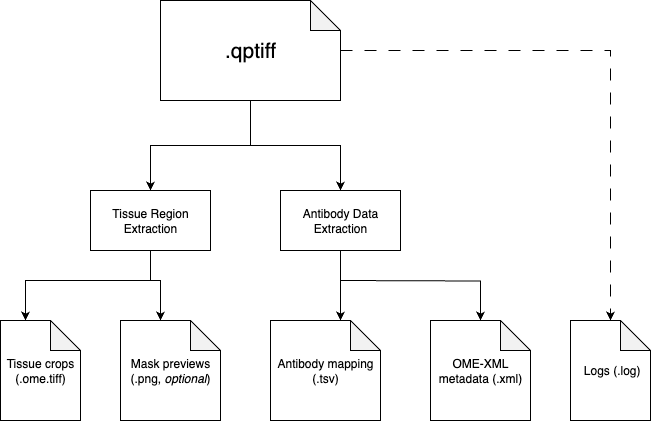
The preprocessing pipeline consists of two sequential steps:
1. Tissue Region Extraction
We provide two methods to extract tissue regions: manual and automatic. Currently, we recommend using the manual method for better precision. The automatic method is used to provide preliminary results before manual annotation.
Manual Tissue Region Extraction
preprocess_napari/napari_annotation.py
This interactive tool provides a napari-based interface for manual annotation and tissue region extraction from QPTIFF files. Key features include:
- Interactive Annotation: Uses napari's polygon tool to manually delineate tissue regions with high precision
- Batch Processing: Processes multiple QPTIFF files sequentially with resume capability
- Auto-Save Functionality: Automatically saves annotations in JSON format with coordinate data and metadata
- Thumbnail Generation: Creates visual overview images showing annotated regions with ROI labels
- Area Calculation: Automatically calculates area for each ROI in both pixels and mm² units
- Quality Control: Supports viewing and regenerating existing annotations for validation
The tool outputs standardized annotation files ({filename}_annotations.json) and visual thumbnails ({filename}_annotation_overview.png) that can be used for downstream tissue region extraction and analysis.
More details about the manual annotation tool can be found in its README file in the preprocess_napari/ directory.
Automatic Tissue Region Extraction
src/extract_tissue_regions.py
This script identifies and extracts regions of interest from the raw imaging data using the following techniques:
- Downsampling of the original image (configurable via
downscale_factor) - Sobel edge detection and watershed segmentation with Otsu thresholding
- Connected component labeling and filtering by minimum area
- Extraction of the largest tissue regions (configurable via
n_tissue)
Each detected tissue region is then cropped from the original high-resolution image and saved as a separate OME-TIFF file.
2. Antibody Data Extraction
src/extract_antibodies.py
This script processes the QPTIFF metadata to extract antibody/channel information:
- Extracts the OME-XML metadata from the QPTIFF using Bio-Formats'
showinftool - Parses the XML to identify channel IDs and antibody names
- Creates a standardized TSV file mapping channel IDs to antibody names
Configuration Parameters
The pipeline uses YAML configuration files located at:
exps/configs/{EXP_SET_NAME}/{EXP_ID}/config.yaml
Key configuration parameters include:
data.file_name: Path to the input QPTIFF filetissue_extraction.n_tissue: Number of tissue regions to extract (default: 4)tissue_extraction.downscale_factor: Factor to downsample the image for initial detection (default: 64)tissue_extraction.min_area: Minimum area for a valid tissue region (default: 500)tissue_extraction.visualize: Whether to generate visualization of detected regions (default: false)tissue_extraction.skip_roi_crop: If true, skips ROI detection and saves the full image (default: false)
Execution Workflow
- The main script (
run_preprocess_ft.sh) defines experiment set name, data directories, and experiment IDs - For each experiment ID:
- Calls
run_extract_tissue.shto identify and extract tissue regions - Then calls
run_extract_antibody.shto extract antibody marker information - All output and errors are logged to
{LOG_DIR}/{EXP_ID}.log
- Calls
Command Arguments
Both extraction scripts accept similar arguments:
--config: Path to the YAML config file--data_dir: Directory containing the input data (default: "../data")--out_dir: Output directory for processed files